Jake Greenlee, Tom Nobal, Carlos Martinez
Period 5
Mr. Yav
Vehicle name: Max (named after how it looks like a mad max car)

Table of Contents
Introduction
Design
Materials
Construction Procedure
Operation of Mousetrap Car
Results
Conclusion/Improvements
Introduction
The purpose of the mousetrap car project is to display knowledge of basic physics principles such as how mass and force affect the speed of the car, how longer and shorter pulley arms affect the distance and speed, and how the heavier the car is the longer it will take to stop. Our first thoughts about this project is that we wanted to rely on a short burst of speed to get us going, and then gravity would take us down the ramp. However we were not sure whether or not the short burst of speed would be powerful enough to get it moving. We also were unsure how powerful the mousetraps were so we were unsure whether going for a fully speed based car would be the best idea. We also wanted to be able to protect our egg and attack the opponent's egg.
Design
When we were brainstorming we had many great ideas. But some of them ended up hindering us instead of helping so we decided to scrap those ideas. We decided that we wanted to gear our car. Our thoughts at the time were that it would dramatically increase our speed so we would have more force when we hit the opponent's car. As seen below, the basic premise behind gearing is that a big gear which is the one being powers turns a smaller gear that spins faster due to shorter turns.

We wanted to gear it as seen above. It would be big gear to small gear, and then back to big gear then to small gear. When we tried this it did not work. Then we tried it with only 1 big gear to small gear. That one worked but it was very slow. Here is one of our prototypes below.

We ended up scrapping this idea and not gearing. We also wanted a mechanism that would be attached to the front of the car and would flip the opponent's car. This ended up being impractical because our classmates' cars were heavier than we expected and wouldn't be able to be flipped easily.

We also wanted a defense mechanism that would flip up and cover the egg after the car started moving (Mr. Yav approved idea). This ended up being way too complex so we scrapped that as well.

The one thing that did work was our idea to raise the egg. This would be easy and it would protect the egg from jousting sticks lower to the ground.

Our final design ended up being this

We added foam in the front to lessen the force exerted on us by other cars and like we said before we ended up not gearing and directly powered the axle with wheels. We also raised our egg platform and added sticks on the bottom as anti tipping mechanisms.
Materials
Plywood- Free- estimated cost around $10
Wooden dowels- Free- estimated cost around $4
Foam- $2
Duct tape- Free- estimated cost around $3
Lego wheels and axles- Free- estimated cost around $10
Mousetrap- $4
Hot glue- Free- estimated around $5
Pipe cleaners- Free- estimated cost around $3
Total Cost: $6
Total Estimate Cost: $41
Construction Procedure
Tom I'm trusting you can do this one. (lies)
The construction procedure does not include procedures used to build prototypes.
Acceleration:
1. Acquire all materials
2. Cut the plywood roughly into this shape. This will be the chassis of the car. Make sure that there is space for the mousetrap and some extra space lengthwise. Make sure that there is enough space in between the prongs for the wheel.

3. Cut two plywood parts in this shape:

4. Glue on the two plywood pieces to the frame so that they stick out the opposite end of the prongs. 5. They need to be far enough apart to fit the front tire without it hitting the edges.
6. Cut the lego parts so that there are 4 lego bearings. Be careful to cut well around the hole you are planning to use, otherwise the hole will be deformed.
7. Glue the lego bearings onto the front tire mount so that there will be space for the wheel. The lego bearings need to be accurately placed apart from each other so that an axle can be spun without difficulty.
8. Repeat on the other side so that there are bearings on both sides.
9. Attach the front wheel by putting the axle on with the necessary spacing.
10. For the back, make sure that the axle is designed like below and attach it and the wheels.

11. Attach the mousetrap to the top of the car with duct tape and hot glue. The activator should be pointed towards the front of the car.
12. Attach a dowel to the mousetrap’s snapper so that it reaches directly over the axle using hot glue and duct tape.
13. Attach a wooden dowel to the end of the stick. There should be about 2 feet of string. Attach the other end of the string to the center of the axle in the back wheel through the hole.
14. For the egg holder, fashion the pipe cleaners into a basket.
15. Then support the egg in the air using the dowels as shown. The basket should be high enough to clear the action of the mousetrap without being hit. The car should look like this:

Joust
1. Acquire about 100 grams of weight. In this instance, we used coins. Attach it to the front of the car in between the mousetrap and the front wheel.
2. Using the pipe cleaners and foam, build towards the front of the car outwards to create a crumple space.
3. Build a second crumple space on the basket towards the front .
4. Attach dowel holders on the frame of basket holder. They should be tight enough to hold the dowels, but the dowels should still be able to move. The car should look somewhat like this at this point:
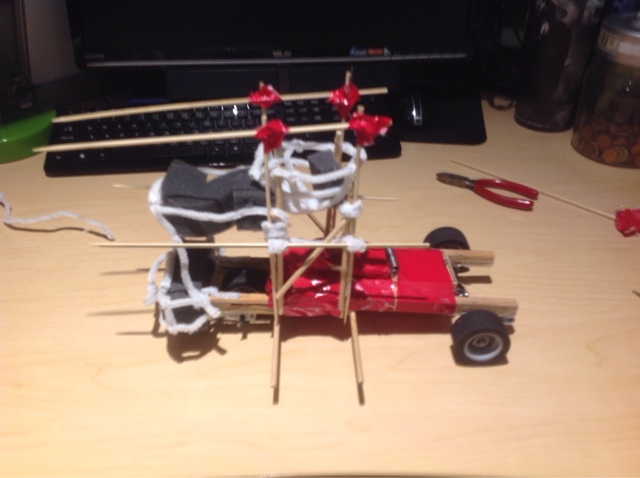
5. Attach a dowel across the bottom of the car perpendicular to its motion.
Operation of Mousetrap Car
The power of the project, as previously noted on the design section, originates with the mouse trap being set off. The spring mechanism embedded in the mouse trap creates power which, through the string, is channeled to the wheels. This happens by means of the mousetrap pulling on the string which is wound around the axle attached to the wheels. The wheels, which are carefully positioned so that the bearings create as little friction as possible, spin quickly and the car moves forward at a high speed. There is also additional work on the car as their is potential energy due to the height. As it moves down the ramp, where gravity adds acceleration, that potential energy turns into kinetic energy. That helps add speed to the vehicle and ramming power that would hit the other car. Hopefully there is little friction to increase speed.
To successfully compete with other mousetrap cars, several other design operations had to be in place. As a defensive tool, a wooden stick was applied at the bottom of the project to prevent it from tipping over. Keeping the egg safe is top priority. There was tons of crumple space added to the front of the car to lighten the impact. This would operate by, when coming to contact, compressing in front of the car, thus taken away energy from the impact. This is similar to the crumple space of a real life car which creates a safety feature for the passenger.
As an attack design, two mounted sticks were added and kept in place with bendable pipe cleaners. The lack of grip on the two sticks allowed them to be moved forwards or back depending on the situation. This also means that the basket would not encounter any significant force to it in the event of an impact, for the sticks would hopefully impact their car. With these additions, there is a secure place for victory in competing with other mousetrap cars.
Results
Our car did remarkably well, getting second place in the acceleration portion with a 1.02 second time to traverse 1.5 meters. We also did well in the jousting portion, getting 2nd place.
Our acceleration was 2.89 m/s/s
G: velocity initial (Vi) = 0m/s, time (t) = 1.02 s, distance (x) = 1.5 m
U: a (acceleration
E: x= Vi*t + ½ a t^2
S: 1.5m = 0 * 1.02s + ½ a (1.02)^2
S: a = 2.89 m/s/s
The egg did crack during our last joust, it fell out of the car and cracked upon impact with the ground.
Conclusion/Improvements
Our mousetrap car was a massive success in competing with other designs, as we got an overall second place and were first among those who never lost. The intricate and thoughtful designs payed off in the end and led to a close victory. Our speed was also surprisingly good, especially with all the extra weight. In fact, our design reached second in class speed with 1.04 seconds to get across the track.
In conclusion, our success leads us to believe that our design was done exceptionally well. Still, there should be improvements added. One thing that could have been improved to achieve full victory is a greater attack mechanism. The majority of our car was constructed to remain cautionary and to keep our egg from falling off. The addition of an attack tool might have allowed us to win. This could be adding more weight to increase the force of the mousetrap car or even an extending arm that would get rid of the opponent’s egg would be effective. That would have geared our path towards victory.